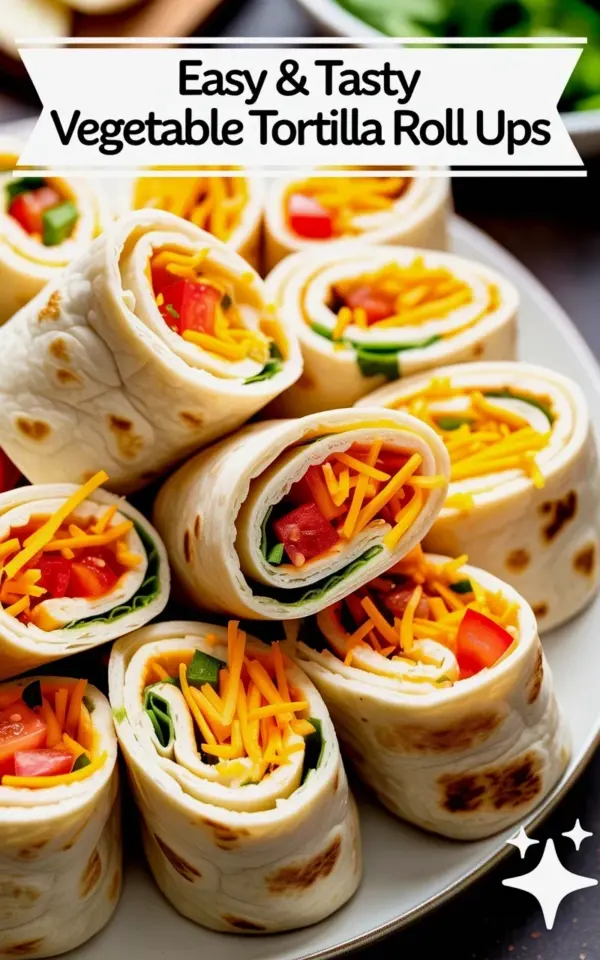
Ok so you’ve got a stack of flour tortillas, a block of cheddar, and a couple of tomatoes sitting on the counter. You’re staring at them wondering what to make that isn’t the same old quesadilla or sad wrap. I’ve been there. These vegetable tortilla roll ups are the answer, and honestly they’re so much more than a quick fix.
The photo shows them perfectly, those beautiful charred grill marks on the outside, the bright red tomatoes and green herbs peeking through the golden cheese when you slice them diagonal. They look like something from a fancy bistro menu, but they take about fifteen minutes to throw together. This is my new favorite way to do a cozy family lunch without blowing the whole afternoon.
## Why These Roll Ups Work For A Quick Family Meal
Look, I love a good sandwich, but there’s something about grilled tortillas that feels special. The heat does magic to the cheese, melting it into those stretchy, gooey layers that hold everything together. When you cut them on the bias, you get these gorgeous spirals of color and texture that make everyone at the table lean in for a closer look.
The other thing I love is how forgiving this recipe is. You can use up whatever vegetables are lingering in the fridge, and it still tastes like you planned it. Tomatoes are the star here, but I’ve thrown in roasted red peppers, some leftover corn, even a handful of baby spinach when I needed to clear out the crisper drawer.
For busy parents, this hits the sweet spot between homemade and weeknight-practical. No oven to babysit, no complicated dough to roll out. Just assembly and a quick sear in a hot pan or on a grill pan if you want those pretty marks.
## The Best Fillings For Vegetable Tortilla Roll Ups
Let’s talk about what goes inside, because the filling is where you can really make this dish yours. Start with a generous layer of shredded cheddar. I prefer sharp cheddar because it brings more flavor, but a mild one works if that’s what your family likes. The cheese acts like glue, sealing the roll so it doesn’t fall apart when you slice it.
Then comes the chunky part. Diced tomatoes should be drained a little so they don’t make the tortilla soggy. If they’re super juicy, I’ll scoop them with a slotted spoon. Fresh herbs are non-negotiable in my kitchen, chopped cilantro adds that fresh pop, but parsley or even chives are lovely too.
Here’s a short list of fillings I rotate through depending on the season:
– Shredded cheese, cheddar or a smoky gouda
– Diced tomatoes, drained well
– Chopped green onions or chives
– Cilantro or flat-leaf parsley
– Sautéed mushrooms and bell peppers for extra veggies
## How To Assemble And Roll Without Making A Mess
The secret to a tight, clean roll is all in the temperature of the tortilla. Cold tortillas crack and fight you, so give them a quick warming in the microwave for about twenty seconds or a dry skillet for a few seconds per side. You want them pliable, not hot.
Spread the fillings in an even line, leaving about an inch of empty space at the bottom edge closest to you. Here’s where I get specific, don’t overstuff them. It’s tempting to pile on the cheese, but if you do, everything squeezes out the ends when you roll. Think of it like a burrito, tuck the sides in first, then roll tightly away from you.
Once they’re rolled, press down gently to seal the edge. The warmth of the tortilla helps it stick together. If you have time, refrigerate them for ten minutes before grilling. It makes them easier to handle and helps the cheese hold its shape during cooking.
## Getting Those Pretty Grill Marks Without A Grill
You don’t need an outdoor grill to get those stunning char marks you see in the picture. A simple cast-iron grill pan will do the trick perfectly. I heat mine over medium-high heat until it’s smoking slightly, then place the rolls seam-side down.
Don’t touch them for the first couple of minutes. Let them sit and develop that beautiful crust. When they naturally release from the pan, flip them over. You’re looking for golden-brown lines, not burnt edges, so keep the heat at a steady medium. It takes about two to three minutes per side.
If you’re using a regular nonstick skillet, you’ll get a more even toasting, which is delicious too, just less dramatic. Either way, brush the pan lightly with oil or use the cooking spray for a crisp exterior. For a fun twist, I sometimes add a little smoked paprika to the oil for extra depth.
## Slicing Techniques And Serving Ideas
Here’s the fun part, the diagonal cut. This isn’t just for looks, although it does make them look incredibly appetizing on the plate. Cutting on an angle creates more surface area, which means you see more of those cheesy, layered fillings. Use a sharp serrated knife and a gentle sawing motion so you don’t squish the roll.
Serve them warm, straight from the pan, while the cheese is still stretchy and melty. The photo shows them arranged on a white ceramic plate with a dark, blurred background, which makes the colors pop even more. I like to add a little bowl of salsa or sour cream on the side for dipping.
These roll ups are versatile enough for any meal. They’re a hit at lunch, cut smaller for appetizers at a party, or served next to a simple bowl of soup for a cozy dinner. Honestly, I’ve even eaten them cold the next day straight from the fridge, and they’re still wonderful.
## Curious About Variations? Try These Twists
This recipe is a base, a starting point. Once you get the hang of the rolling and grilling, you can adapt it to any season or craving. In the summer, I swap the cilantro for basil and add some fresh corn kernels. During the fall, a little roasted butternut squash and sage would be incredible with white cheddar.
You can also change the protein. Leftover shredded chicken or crumbled ground beef turns this into a heartier meal. For a spicier kick, add a chopped jalapeño or a few dashes of hot sauce to the filling. The key is balancing moisture and flavor so the roll holds together and keeps things interesting.
One small warning from personal experience, don’t skip the first heating step. I tried to speed through it once and the tortillas split right down the middle. It was a mess. A good one, but still a mess. So take the extra minute, it really pays off in the end.
## Wrapping Up These Vegetable Tortilla Roll Ups
So there you have it, a simple, flexible meal idea that looks way more complicated than it is. Those beautiful grill marks, the gooey cheddar, and the fresh tomato herby filling, it’s a combination that just works. I hope these become a regular in your home like they are in mine.
Have you tried making rolled tortillas before? What’s your favorite filling combo? I’m always looking for new ideas, so drop a comment below and let me know what you’d put inside yours. Happy rolling.
Leave a Comment