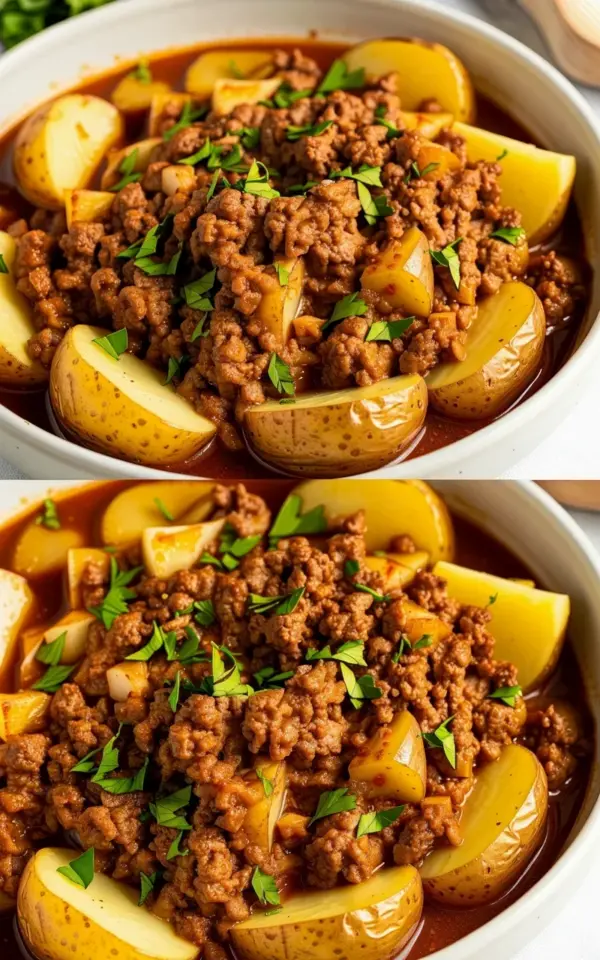
Let me paint you a picture. You brown your ground beef with onions, ginger, garlic, all those warm spices. Then you toss in cubed potatoes and let everything simmer together until tender. Sounds perfect, right? Wrong. That is the number one mistake people make when cooking aloo keema. You end up with sad, mushy potato bits that dissolve into the sauce instead of the firm, golden, caramelized chunks you see in the photo above. I learned this the hard way after ruining three batches in a row. Honestly, I wanted to cry into my bowl of rice.
Look, I am not a trained chef. I am just someone who loves a good budget-friendly one-pot meal that feeds my family without breaking the bank. And aloo keema is exactly that. Ground beef is cheap. Potatoes are cheaper. Together they make magic. But only if you treat those potatoes with respect. So here is what I do now. Parboil them until just fork-tender. Pan-fry them separately until they get that crispy, caramelized crust. Then mix them into the glossy, dark brown beef. It changes everything. You get these little golden nuggets that soak up the sauce without falling apart. Try it once and you will never go back.
This article is for the real home cooks out there. The ones working with a tight grocery budget, craving something hearty, and tired of Pinterest recipes that look amazing but flop in real life. I have your back. Let us break down exactly how to nail aloo keema every single time, starting with the biggest mistake and moving to the smartest fix.
Why overcooking potatoes ruins your aloo keema
Here is the thing. Potatoes are mostly starch and water. When you drop them into the simmering keema and let them cook for twenty minutes, they absorb excess moisture. They swell. Then they break apart. By the time the sauce reduces, you are left with a starchy mush that coats the meat in a weird gluey texture. Not great. Not what you want.
I remember one Sunday afternoon. I was so confident. I had everything prepped. The beef was browning beautifully, the onions were caramelizing, the aroma of cumin and coriander filled my tiny apartment. I added the potatoes, covered the pot, and walked away to fold laundry. Big mistake. I came back to a pot of sad, crumbling potato shreds mixed with perfectly good beef. My husband ate it silently. That silence said everything.
So please, do not do this. The potatoes need a different treatment. They need a head start and a separate path to glory.
Parboil your potatoes for perfect texture
Ok so step one, grab your potatoes. I use Yukon Gold because they hold shape well and get nice and creamy inside, but russets work too if that is what you have on a tight budget. Peel them. Cut them into even chunks, about one inch. Not smaller or they will overcook. Not bigger or they will stay raw in the middle.
Drop them into a pot of cold salted water. Bring to a boil. Then reduce to a simmer and cook for exactly 5 to 7 minutes. You want them just fork-tender, meaning a knife slides in with a tiny bit of resistance. No mush. Then drain them immediately. Let them steam dry in the colander for a minute or two. This step alone saves your dish from collapse.
Why does parboiling work? Because the potatoes get partially cooked, which removes some surface starch. They become more stable. They will not fall apart when you fry them or add them to the sauce. Plus, the exterior dries out a bit, which helps with browning later. It is a small extra step that pays off huge.
Pan-fry the potatoes until golden and crispy
This is where the magic happens. My secret weapon. After parboiling, heat a separate pan (I use a cast iron skillet if I have it, but a nonstick works fine) with a tablespoon of oil. Canola or vegetable oil is fine. Butter works too but watch the smoke point. Add the drained potato chunks in a single layer. Do not crowd them. If you have to do two batches, do two batches. Crowding makes them steam instead of fry.
Let them sit undisturbed for three to four minutes. The bottoms will turn a deep golden brown, almost caramelized. Then flip each chunk. Repeat on the other sides. You want a crust all around. The potatoes should look like the ones in the photo above: halved, with crispy exteriors and a rich yellow interior. Sprinkle a pinch of salt and a crack of black pepper while they fry.
Honestly, I sometimes eat a few straight from the pan at this point. No shame. They are that good. But resist the urge to eat them all, because they are about to become the star of your aloo keema.
Build the keema base on a budget
Now for the beef. Aloo keema traditionally uses ground lamb or beef. I go with beef because it is cheaper and easier to find. One pound feeds four people with leftovers if you stretch it with potatoes. Brown the beef in the same pot you will use for the final dish. Do not drain the fat entirely, leave a tablespoon or two for flavor. Add finely chopped onions, two to three cloves of minced garlic, and a thumb of grated ginger. Cook until the onions turn soft and translucent.
Spices are where you save money too. You do not need a dozen fancy blends. Keep it simple:
- 1 teaspoon cumin seeds (or ground cumin, whatever you have)
- 1 teaspoon coriander powder
- ½ teaspoon turmeric
- ½ teaspoon red chili powder (adjust to your heat tolerance)
- 1 teaspoon garam masala at the end
Toast the spices in the hot oil for about thirty seconds. This wakes them up. Then add a can of diced tomatoes (14 ounces). Or use two fresh tomatoes chopped small if you have them. Simmer until the tomatoes break down and the oil separates. That glossy dark brown sauce you see in the image? That comes from letting the mixture reduce until the moisture cooks off and the meat gets coated in a rich, concentrated sauce. Do not rush this. Give it ten minutes on medium low.
I know it is tempting to skip the tomato and just use water. Do not do that. The acidity balances the richness of the beef and gives that deep color. And canned tomatoes are dirt cheap. Stock up when they are on sale.
Combine potatoes and beef at the very end
Here is the final trick. Once your keema base is done and the sauce is thick and glossy, turn off the heat. Gently fold in your pan-fried potato chunks. Stir just enough to coat them in the sauce. Do not cook them any further. The residual heat warms them through without breaking them. You want each potato piece to remain distinct, with a crispy edge visible through the dark gravy.
If you are worried about the potatoes absorbing too much liquid, add a splash of hot water or beef broth to the keema before folding. But start with half a cup. You can always add more. The sauce should cling to the meat and potatoes, not pool in the bottom of the bowl. The photo shows that exact texture. Moist, glossy, but not soupy.
Let the dish rest for five minutes before serving. This gives the flavors time to meld. I usually cover the pot loosely with a lid during this rest. Then I sprinkle a generous handful of fresh chopped parsley on top. The photo shows green parsley scattered throughout. It adds a pop of freshness against the rich brown. Cilantro works too if you prefer. Or a mix of both. Whatever you have on hand.
Serve it alongside the cheapest, stretchiest sides
Aloo keema is the main event, but it is even better with something to soak up the sauce. Rice is the obvious choice. Basmati if you can swing it, but plain long-grain works fine. I make a big batch of rice at the start of the week and use it for multiple meals, saves time and energy. Naan or roti from the freezer aisle is another budget-friendly option. Warm it in a dry skillet for thirty seconds per side.
Here is a weird little aside for you. I once served this with leftover baked potatoes instead of rice. I had three sad russets sitting in the fridge. I split them open, spooned the keema over top, and it was honestly fantastic. So do not be afraid to improvise. The whole point of a one-pot dinner is using what you have.
And since this is a one-pot meal (well, technically a two-pot meal if you count the potato pan, but still minimal cleanup), you save on dishes. That is a win for anyone who hates scrubbing pans after dinner.
Frequently asked questions from real home cooks
Can I skip the separate pan-frying step? You can, but you will get mushy potatoes. I tried it once when I was too lazy to wash an extra pan. Regretted it immediately. The texture just is not the same. That crispy golden exterior is what makes the dish special.
What if I only have ground turkey? Turkey works, but it is leaner. Add a tablespoon of oil when browning so it does not dry out. Spices might need a slight boost too, a little extra garam masala helps.
How do I store leftovers? Put them in an airtight container in the fridge for up to three days. Reheat gently in a skillet with a splash of water. The potatoes soften a bit overnight, but they hold up way better than if you had boiled them in the sauce.
Is this recipe gluten-free? Yes, as long as you check your spice blends. Some pre-mixed garam masala contains wheat flour as a filler. Buy whole spices and grind them yourself, or look for certified gluten-free blends. Or just skip garam masala and use a pinch of cinnamon and clove powder instead.
This is not a hard recipe. It is forgiving. You just have to respect that potatoes are divas. They demand their own cooking timeline. Give it to them and they reward you with the best aloo keema of your life.
So next time you are staring at a pound of ground beef and a bag of potatoes, remember this. Parboil, pan-fry, then fold. That is the secret. Your family will think you spent hours in the kitchen. You will know the truth. But you can keep that between us.
Save this recipe for your next one-pot dinner. And do not forget the parsley. It makes the plate look pretty, and honestly, eating something beautiful just tastes better.
#alookeema #groundbeef #potatorecipes #onepotmeal #dinnerideas
Leave a Comment