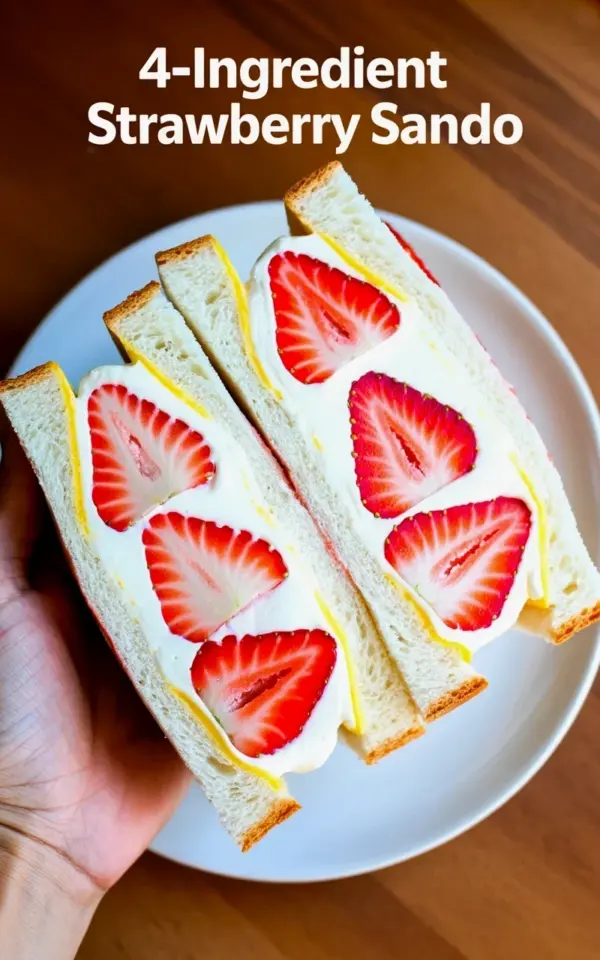
I have a confession. The first time I saw a strawberry sando on my feed, I genuinely thought it was some kind of fancy cake pretending to be a sandwich. Cut diagonally, the white bread showing just a peek of cream and bright red fruit, it looked too elegant to be a budget dessert. But here’s the thing: this Japanese strawberry sando is just bread, cream, sugar, and strawberries. That’s it. Four ingredients, almost no skill required, and it costs pennies compared to a bakery slice. I made one last week for a last-minute gathering and my friends literally stopped talking to stare at it. Not gonna lie, that felt good.
Look, I am not a trained pastry chef. I burn toast on a regular basis. But this recipe works for me because it skips all the fussy steps. There is no gelatin, no piping bags, no complicated layering. You just need soft bread, thick cream, a little sugar, and fresh strawberries. That diagonal cut we all swoon over? It is purely cosmetic but it makes the whole thing look like a million bucks. Or in this case, maybe four bucks. Max.
What Makes a Strawberry Sando So Special?
Honestly, the magic is in the contrast. You have this pillowy, slightly sweet white bread that squishes under your fingers. Then you get a cloud of lightly sweetened cream that is rich but not heavy. And right in the middle, there are these bright, tart slices of strawberry that cut through all that richness. It is a perfect bite. Every single time. The sando tradition comes from Japanese convenience stores where they package these sandwiches in little plastic wedges and sell them for pocket change. But making it at home lets you control the quality and the cost. And the quantity. You can eat three. I have done that.
Now, about that photo everyone loves. The one with the sandwich on a white plate against a wooden table. The strawberries are cut into neat triangular segments, showing off their seeds and that deep red flesh. The cream is thick enough to hold its shape but soft enough to squish when you bite down. That precise look is actually very easy to replicate. It just requires a sharp knife and a little patience. And not smooshing the bread while you cut it. That part I learned the hard way.
4 Ingredients You Actually Need for This Budget Dessert
Here is the shortlist. No weird substitutions, no hunting for specialty items. Just things your grocery store definitely has.
- Japanese-style milk bread (or a soft white bread alternative): Shokupan is ideal but any fluffy white bread works. Brioche is too rich. Plain old white sandwich bread is fine if you get the thick sliced kind. I have used Texas toast in a pinch and it was surprisingly good.
- Heavy cream (at least 36% milk fat): This is non-negotiable. Whipped cream from a can will collapse into a sad puddle. You need heavy cream that whips up thick and stable. I chill my bowl and beaters for ten minutes before I start. It helps.
- Powdered sugar or granulated sugar: Two tablespoons per cup of cream, give or take. I like powdered sugar because it dissolves instantly. But granulated works fine if you whisk it long enough. Just don’t use honey or maple syrup here. It makes the cream weepy.
- Fresh strawberries: Get the ones that are red all the way through. Pale strawberries or ones with white shoulders will taste sour in the wrong way. I look for berries that are firm and fragrant. The smell matters more than you think.
That is the whole list. Four things. You probably already have sugar in your pantry. So really you only need to buy three items. That feels like cheating but it is not.
How to Assemble the Perfect Japanese Sando Without a Recipe
Ok so the technique matters more than the ingredients list suggests. But it is still dead simple. First, wash and dry your strawberries. Then hull them and slice each one into three or four even rounds or triangles. I like triangles because they stack nicely and look pretty in the cross section. Set those aside on a paper towel to absorb extra moisture. Wet berries make the bread soggy. And nobody wants soggy sando.
Next, pour your cold heavy cream into that chilled bowl and start whipping. Add the sugar once the cream starts to thicken a little. Whip until medium stiff peaks form. You want the cream to hold its shape but not be so stiff that it gets grainy. If you over-whip, it separates into butter and liquid. I have done that exactly once and it was a tragedy. So stop when the cream looks like soft clouds and holds a gentle peak when you lift the whisk.
Now spread a thick layer of cream on one slice of bread. Not a dainty schmear. A generous, almost excessive layer. Arrange your strawberry slices on top in a single layer, overlapping slightly. Add a little more cream on top of the strawberries to fill the gaps. Then place the second slice of bread on top, cream side down. Press very gently. Do not squish the bread. Just enough to make it stick together. Wrap the whole sandwich tightly in plastic wrap. Refrigerate it for at least 30 minutes. This step is critical. It lets the cream firm up and soak into the bread just enough to make it cohesive. If you skip the fridge time, your sando will fall apart when you cut it. I learned that the hard way too.
That Signature Diagonal Cut: How to Nail It Every Time
The diagonal cut is not just for looks, even though it is extremely pretty. It creates those two long triangles with the strawberry slices visible in a neat row. Here is how to do it without destroying your work. After the sandwich has chilled, take it out of the fridge. Keep it wrapped in the plastic. Use a very sharp serrated knife. I mean very sharp. A dull knife will drag the cream out and squish the bread. We have all seen that sad, messy result.
Slice the sandwich diagonally from one corner to the opposite corner in one smooth motion. Do not saw back and forth. Just one clean cut through the plastic wrap. The wrap helps hold everything in place. Remove the plastic after cutting. Then place the two triangles on the plate with the cut sides facing up. That is the money shot. The photo that makes everyone ask for the recipe. The strawberries should appear as a clean red stripe across the white cream. It is genuinely satisfying to see it work.
Why This Recipe Is the Perfect Budget Dessert for Spring Gatherings
Spring is strawberry season in most places. And that means the berries are cheap, abundant, and actually taste like something. I wait all year for April and May when local strawberries show up at the farmers market for a reasonable price. That is when I make sandos nonstop. A single batch costs me maybe four dollars for four whole sandwiches. Compare that to buying one slice of strawberry shortcake at a cafe for eight bucks. The math is clear.
This dessert is also ridiculously easy to scale up for a party. You can make a dozen sandos in under an hour if you have a helper to slice berries. I bring them to picnics and potlucks and they disappear first. Every time. People pick them up, turn them around, take a photo, and then take a bite. There is something about that combination of textures and colors that feels special without being fussy. And since it requires no oven, no stovetop, no special equipment, it is perfect for hot days when you refuse to turn on the kitchen.
Pro Tips and Common Mistakes When Making Strawberry Sando
Not gonna lie, I messed up my first three attempts. Here is what I learned so you do not have to make the same errors. First, never use whipped cream from a can. It deflates under the weight of the strawberries and makes the bread wet. Second, do not skip the chill step. Thirty minutes minimum. An hour is better. The cream needs to set so it does not ooze out the sides when you cut. Third, if your bread is too fresh and soft, it will tear when you spread the cream. I sometimes leave my bread out on the counter for an hour before assembling. It dries just enough to handle the cream without falling apart.
And one weird thing: I store leftover sandos (if there are any) in the fridge with the cut sides facing up on a paper towel inside an airtight container. The paper towel absorbs extra moisture so the bread does not get soggy overnight. It is not perfect by day two but it is still edible. Honestly, these are best eaten within a few hours of assembly. They do not keep well for a full day. That is fine. It just means you have to eat them all immediately. What a terrible problem to have.
Conclusion
If you have not tried making a strawberry sando yet, this is your sign. It is cheap, simple, and looks like you spent way more effort than you actually did. The combination of fluffy bread, sweet cream, and tart berries is classic for a reason. And that diagonal slice will make you feel like a professional baker even if you are not. So grab a few strawberries, some heavy cream, and a loaf of soft white bread. Give it a shot this weekend. Your friends will be impressed, your wallet will thank you, and you will probably want to make another one the next day.
Have you tried making a strawberry sando before? Let me know in the comments how yours turned out. I would love to hear about your experiences and any tiny tweaks you discover along the way.
#strawberrysando #japanesesando #budgetdessert #4ingredients #strawberryrecipe
Leave a Comment